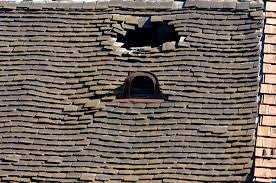
How can I temporarily cover a hole in my roof?
What is the best way to temporarily patch my roof?
Tomorrow I’m going to be taking two chimneys out of my house. They are both brick and mortar chimneys. Both of them stick out the middle of my roof — i.e. neither is on the side of the house. I’ve got an air hammer and will be removing them brick-by-brick.
Once I get the chimneys below the roof, I’m going to want to temporarily patch the roof. I’ve seen online how to tarp a roof. But it looks like you have to nail the tarp to the roof. Doesn’t that damage the integrity of the roof? I wonder if I could just use that tacky felt paper and cover it for a day or so.
One of the problems is that since I live in Seattle, it will likely be raining tomorrow — and for the rest of the week — and likely for the rest of the month. So I need something that will give me some immediate coverage until I can get a roofer out.
The Best Methods for Patching Holes in Your Roof
Imagine for a moment that you have just arrived home after a windstorm and notice water dripping from the ceiling. Upon further investigation, you discover that a tree limb has fallen and punched a hole in the roof. There are some things you can do yourself to keep things under control until the permanent repairs can be made.
Call for Help
One of the first things you will want to do is to call your local home improvement contractor for help. The sooner this is done, the sooner the repairs can be made that are done permanently and correctly. The contractor may be able to advise you of some temporary measures that can be taken until someone arrives to make the repairs. Remember that temporary repairs are just that: temporary. For that reason, you don’t want to delay having a professional do the permanent repair so you won’t have to worry about it leaking again.
Safety
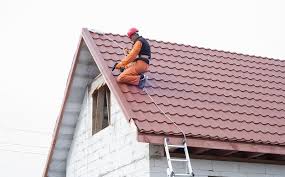
When attempting to patch a hole in the roof yourself, the number one thing to keep in mind is safety. Doing work on a roof by nature puts you at risk of injury due to falling, either falling off the roof or falling from the ladder while trying to access the roof. Make sure the ladder is stable and secure by checking it before climbing. Also make sure enough of the ladder is sticking up beyond the edge of the roof to provide a hand hold for getting on and off the roof.
Never try to get onto the roof while the storm is still going on. There are too many dangers. You could be struck by lightning or blown off the roof by the wind. You could also be struck by another falling tree limb. In addition, while the roof is wet, it will be slicker than it is when it is dry.
Instead of trying to get onto the roof while the rain is still going on, you should do what you can to minimize the damage from below. This includes putting pails or other containers under the leak to catch the water. You might need to move furniture or other items that are not permanently installed out of the way.
Cover the Hole
The easiest way to keep water from coming through a hole in the roof until it can be fixed is to cover it. This can be done with the use of a tarp. Simply lay the tarp across the hole and place things around the edge of it to keep the wind from blowing it off. If possible, you should place the tarp in such a way that the upper edge of it overlaps the ridge of the roof. This will help keep water from running down the roof, under the tarp and into the hole.
Patch the Hole
If you are a bit handier with using tools for projects around the house, there are some things you can do to patch the hole. The shingles can be removed from the area adjacent to the hole. The hole can then be plugged with using wood and roofing tar, or you can purchase a kit that is especially designed for this purpose. However, either of these methods can be quite involved so you might want to leave this to the professionals.
How to Fix a Hole in the Roof
A hole in the roof invites disaster–from water damage on drywall and flooring to animal infestation. Temporary patch jobs are only effective until the rain starts. Repairing a roof should be a top priority for any homeowner. Handyman types who are comfortable on a roof can use basic carpentry skills to make this home repair without hiring a roofing contractor.
Step 1
Wear safety goggles and rubber-sole work shoes. Use an extension ladder with the third rung against the eave to access the roof. Carry tools in a tool belt.
Step 2
Take up the shingles over the hole. Slip a pry bar under the shingles above the affected area to pull out the nails holding the damaged shingles. Use hammer claws to help remove all nails from the shingles over the hole.
Step 3
Prepare the plywood or sheathing around the hole. If the hole is a cutout for a vent, the wood may be ready for repair. A hole from tree damage will be oddly shaped and splintered. Use a reciprocating saw to cut a square or rectangle shape around the hole and remove all splintered wood. Cut the plywood in half between the rafters if the hole is big enough.
Step 4
Patch the wood with plywood of the same thickness. Install a 2-by-4 brace under a small hole that extends three times the width of the opening. Hold it against the inside of the plywood by pulling up through the hole while driving deck screws through the roof and into the brace. Use a jigsaw to cut a rounded shape from the plywood to the exact size of the hole. For large patches, nail 2-by-4 braces inside the existing rafters with 10-penny nails. Replace a plywood section with new plywood cut to fit the exact size. Nail the plywood sheet section to the braces with 8-penny nails. Cover the wood borders and bracing screws on top of any roof patch with roofing tar.
Step 5
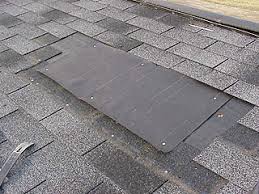
Lay roofing felt or tar paper over the missing shingles. Slip the top of the paper in under the flaps of the shingles above the repair. Lay the upper sheet of tar paper 2 inches over the lower if two sheets are needed to cover the section. Nail tar paper on with roofing nails over every 18 inches of the perimeter and along any overlapping sheets.
Step 6
Lay new shingles over the repair section. Remove the adhesive cover strip and lay the bottom row of shingles first. Use three roofing nails across the horizontal center line to secure each shingle. Cover the lower row with the flaps from the next row up. Tuck the straight edges of the uppermost row under the remaining shingles and nail them under the flaps. Dab roofing tar over each fresh nail for added water protection.
Temporary hole-in-roof fix
Was your roof severely damaged in a recent storm? If strong storm winds ripped up your roof shingles, the rest of your home is at risk from leaking water or additional wind damage. A quick and cost-efficient fix is to simply cover the damaged area of your roof with a durable plastic tarp. Plastic tarps come in a variety of sizes; because of its inexpensiveness it’s a good idea to buy plastic tarps in different sizes. That way you’ll have different tarp options depending on the damage size of your roof.
One of the most durable types of tarps comes in polyethylene weaves with border piping and heat-sealed seams. We usually don’t recommend nailing anything to your roof, because the possible damage made to your shingles. But in the event where you need an emergency fix where you’ll eventually reinstall shingles in a roof repair, nailing is a necessary option for keeping covering a large hole on your roof with a tarp. Nail down the edges and if you can, cover the nail heads with roofing cement to prevent rain from entering your home.
Temporary shingle fixes
Have any of your shingles been damaged to the point where they’re loose, curling, or even ripped off of your roof? You can use a heat gun to soften and then straighten out any curling shingles, or use high quality glue to glue down to your roof loose or ripped off shingles.
Have any 2-inch 6D galvanized nails? Another temporary fix for loosened shingles is to nail them down securely with your 6D nails. Make sure that once all nails have been securely put in place on your roof to cover the nail heads with roofing cement. This ensures that the storm or wind that originally loosed the shingles won’t loosen the nails.
Don’t have 6D nails but you do have roofing cement? Help seal up your roof by applying the roofing cement to any damaged or cracked shingle joints, or to your roof flashing to help seal the roof.